Technical Guidelines
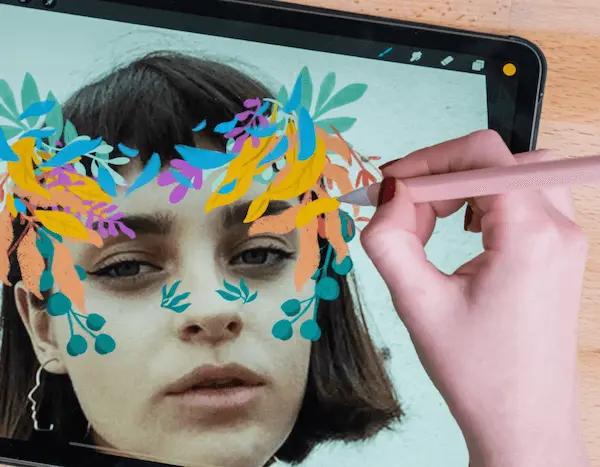
Effect creation in DeepAR
Whether you’re just getting started in augmented reality or you're a seasoned 3D pro, you’ll be able to create awesome things in DeepAR Studio!
This document covers some tips and best practices for creating the best quality AR assets for DeepAR using DeepAR Studio.
Before Studio
First Concepts
As with all creative processes, a great first step is to gather references and plan out how your effect idea is going to look in the end, using images, sketches and simple mockups. Starting without a clear idea makes it much harder to achieve great results. Experimenting and changing your mind is of course inevitable, as soon as you go back to this stage once you have a plan. The 3D creation part can be frustrating without a clear vision. Try things out and explore ideas now, before moving forward.
You can join the DeepAR Community Forum to get and share ideas with other people who are making cool things!
3D Model Preparation
In this step, you can use your 3D tool of choice to prepare your model. Any program that can export files as .fbx is fine. If you’re unsure where to start, we recommend Blender as a great first step (and it’s free!).
References
Use our reference model for spatial reference for your effect. You can start building your effect around this model. You can always move and scale things later in the DeepAR Studio if needed, but it will save you time later if you have everything placed correctly.
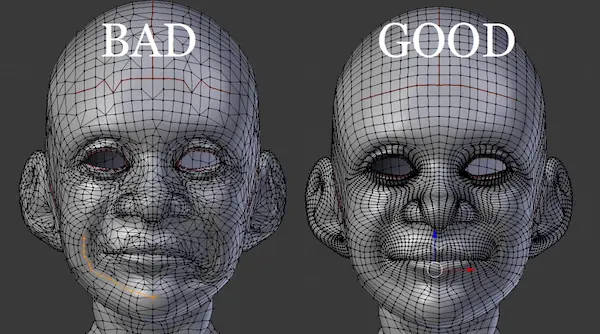
Clean topology
To create assets that avoid complex and invalid topologies, use quads and the edge loops should follow the flow of the mesh. If you are buying or 3D scanning objects you might want to retopologize first, or at least optimize them as much as you can.
Good steps for optimization include:
- Convert the mesh to quads
- Fix topology
- Reduce polycount
- Fix normals
- Remove overlapping edges or faces
Low poly count
Keep the poly count as low as you can. This means avoiding excessive smooth passes or unnecessary geometry that you are not able to see on the screen. This will keep the file size low which will run more smoothly, especially on older or less powerful devices. Maximum file size of 10MB for a final effect is a good target.
Unwrap UVs
You should unwrap the UVs of all 3D meshes that are going to need textures. It’s best to put them all in the same UV space with 0 to 1 window and make sure they don’t overlap.
Optimize UVs
Try to use as much of that 2D square as possible (the larger the UV isles are, the better quality you’ll get from your textures). The pieces of geometry that are physically larger or are more frontal/important in the effect should have larger UVs (tiny pieces won’t need a lot of UV space since you won’t be able to see them close up anyway).
Clean up
Before you export your FBX, make sure all of the meshes have no transformations (reset and freeze transformations), so your pivot points are all centered in (0,0,0) and your translation and rotation values are all set to 0 and scale values are 1.
Textures
Experiment with shaders and maps
It’s a good idea to experiment with the shaders provided within the DeepAR Studio, understand how they work and choose which shaders work best for you. Then think about the maps that you need for that shader. Albedo (color), AO and Normal maps are the most common.
Optimize your textures
The smaller the textures you have, and the smaller the final file size, the better your effect will perform. Keep in mind also the size of your elements in your final effect composition and if your creation is for a smaller screen (like a mobile phone) larger screen like a TV.
DeepAR Studio
Build
Import your FBX and texture files, then set up the shaders and animations, if you have any.
Check our quick start project example for some help.
Preview & Test
You can use the live preview and test on device features to see how your effect will look, then export it ready for use.
Test your effect on a mobile device with our effect tester apps for iOS and Android. Make sure to test on your target platform and device.
Export & Publish
You can export your effect ready for use in your app using the DeepAR SDK. For best results and to ensure your effect will run smoothly on a wide range of devices, check out the technical requirements below.
You can get started with the DeepAR SDK here and learn how to use an exported effect in your app.
To integrate the DeepAR SDK you’ll need to know the basics of programming on that particular platform. Don’t worry if you don’t yet know how to code - you can certainly pick it up with the help of YouTube, some of our official partners can help, or enlist the help of a friendly robot.
Technical Guidelines
Let’s make sure your effects are not only super fun and top-notch but also run smoothly on all kinds of devices. This section gives you a bunch of tips on how to boost the performance of your effects and also lays out some technical guidelines for imported objects and textures.
Asset preparation
While the hard limit on texture size is 2048px x 2048px, it’s best not to exceed 512x512. Larger textures often create slow loading times and affect tracking quality, especially on older devices. You might be surprised how smaller texture files can still produce high quality results.
We tend to use a rule of thumb used in the gaming industry: Both quality and performance matter, but performance matters more. People may enjoy a lower-poly experience that performs well (think Lego, Minecraft) but nobody tolerates a high graphic game that is jittery and jumpy.
For this reason, we recommend keeping the geometry as minimal as possible:
- It’s best to use quads and avoid funky geometry.
- For best performance, try to keep a poly count below 25k per mesh, with a total poly count below 100k.
- We recommended adding no more than 50 objects to a scene.
You can check the triangle count in your 3D modelling software. Here’s a great guide for finding it in Blender.
It’s a good idea to avoid complex blend shapes where possible, as well as using bones or animations only where necessary, as all of these things will impact the performance of your final effect.
You can also consider removing polygons that won’t be visible, for example the inside of shoes. Just like a stage set, we only need to see the facade for the magic to be believable. 🪄
Importing Models and Meshes
Built-in meshes
DeepAR Studio has handy built-in meshes to help with common tasks, such as Eyes2D, Foot Occluder, Sphere, etc.
Mesh types
Static meshes: Has the smallest performance impact, so favor these if possible.
Bone-driven meshes: Use when tracking specific facial features, such as lips or chin.
Vertex-driven meshes: Use when working with the Dense Mesh (for face) and the eyes or lips 2D meshes (usually for makeup).
Face culling
We recommend using face (Clockwise/Counterclockwise) culling if possible. Face culling improves performance by not drawing invisible triangles. You can improve the performance of your effects by selecting a culling mode other than ‘Off’ wherever it suits your project.
Errors and Warnings
Studio will try to be helpful by reporting issues with your project as they happen, so you can avoid any broken or unexpected effects.
You can find a list of all of your errors and warnings by opening the ‘Troubleshooting’ window (Windows → Troubleshooting or Shift+CMD+T/Shift+CTRL+T)
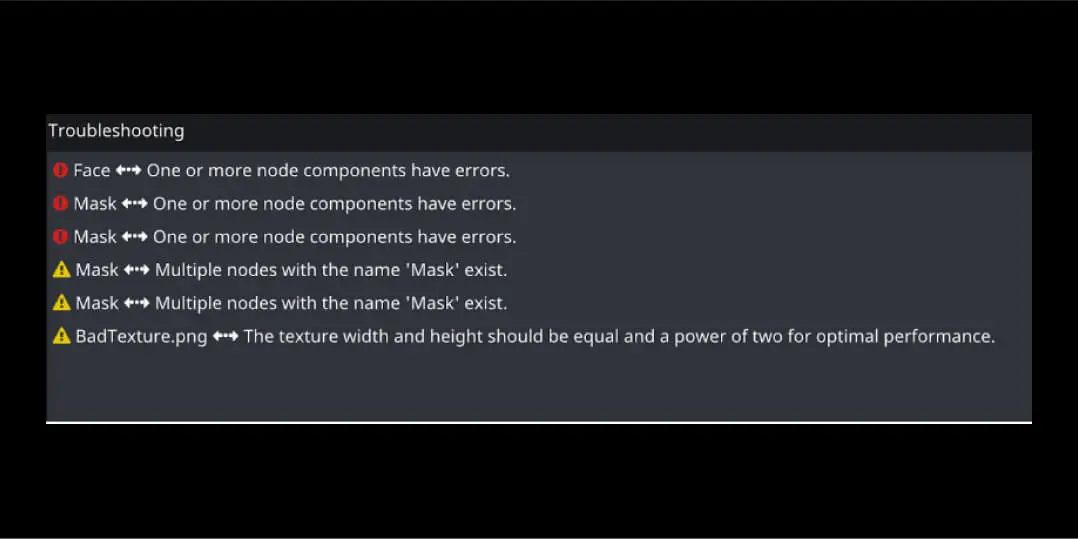
❗️Errors (Red): Something is most likely broken, and will not work in your effect. It’s quite important to get these fixed as soon as you can since you can’t export effects with errors.
⚠️ Warnings (Yellow): Something might work okay in for now, but might not on a different platform or cause an issue at some point in the future. Examples include: Shaders that will work, but not display in the Editor, textures that will work on Native SDKs, but not the Web, Duplicate names that might cause an issue when trying to change some parameters at runtime/using Scripts, etc.
If you’re stuck with issues you can’t solve, your answer may already be on the DeepAR community forum, or if not, please do post and a member of staff or the community will try to help. If you’d like to share your effect with us privately, you can contact us.
Nodes and components
Multiple components
When adding the same component to multiple nodes, it’s usually best to add all nodes you’d like to receive the component under one parent node (in a ‘group’), then apply the component to the parent node.
This is because each instance of a component is yet another thing your user’s device will need to process, which can impact their experience.
For example, in this example, we have the Face Position component which will cause the Mask and Hat nodes to be tracked by the face:

A better organization would be to make a parent node called ‘Face’ and apply the Face Position component to it, then add both Mask and Hat as children:

Trimming
It’s a good idea to check your project now and again for ‘dead nodes or components that no longer serve a purpose. As you try different things out, it’s quite common to end up with nodes or components that aren't doing anything anymore but are still impacting performance. Trimming these back will keep your effect as efficient as possible.
Node names
It’s best to avoid using the same node name twice. This can cause issues if you ever need to use scripting or change parameters at runtime because the node name is used to target parameters on this node.

Textures
The smaller the textures you have, the better your AR effect will perform. If your creation is for a smaller screen (like a mobile phone), or people aren’t likely to see that aspect of your effect up-close, you can consider using a smaller texture.
When creating textures you should make sure they are as small as possible. Textures above 512x512 start to increase the size of your effect export size significantly, so it’s best to only use them when needed.
Alpha channels (like transparent backgrounds) also increase the size of the texture, so it’s best to use them only if your texture has an irregular shape. Consider using compressed textures and small resolutions in order to get a faster loading time and better performance on your effect.
A good way to improve performance is to use ‘blend modes’ instead of transparent backgrounds in your texture. For example, like using ‘Multiply’ with all unnecessary areas of your texture in pure white or ‘Add/Lighten’ for a bright texture on a black background.
Other good tips are:
Ensure LUTs, normal maps, metallic maps, etc have been imported as non-color data
Ensure mipmaps have been turned off when importing LUTs
Ensure non-color data (LUTs, normal maps, metallic maps, etc) are in PNG format
Ensure color data has been imported as lossy
We attempt to do this automatically on import, but if something doesn’t look right, it’s best to check your texture settings. You can find them by selecting your texture and clicking ‘Change settings’ in the preview panel. From here, you can adjust the settings and re-import the texture.
For best performance on web
Due to restrictions out of our control, textures work best on the web when they’re square and have a width/height that is a power of 2, such as:
- 2 x 2
- 4 x 4
- 16 x 16
- 32 x 32
- 64 x 64
- 128 x 128
- 256 x 256
- 512 x 512
- 1024 x 1024
- 2048 x 2048
Videos
Video textures are not supported on the WebSDK.
Any resolution of video textures is supported, however, we recommend using square, power of 2 resolutions. Non-square videos can have "green line" artifacts on some Androids devices. For best results:
- Use .mp4 files with the h264 (AVC) codec
- Reduce the bitrate of your videos when encoding
- Audio from the videos can not be played, removing it from the video will save resources
- Use square, power of 2 video resolution
- Reduce the video resolution as much as possible. Try to not exceed 512x512
Animations
Models
Try to optimize model animations. Ensure that the animation affects the common parent object, not every node individually. Try to make simple looping animations instead of overly long repeating ones.
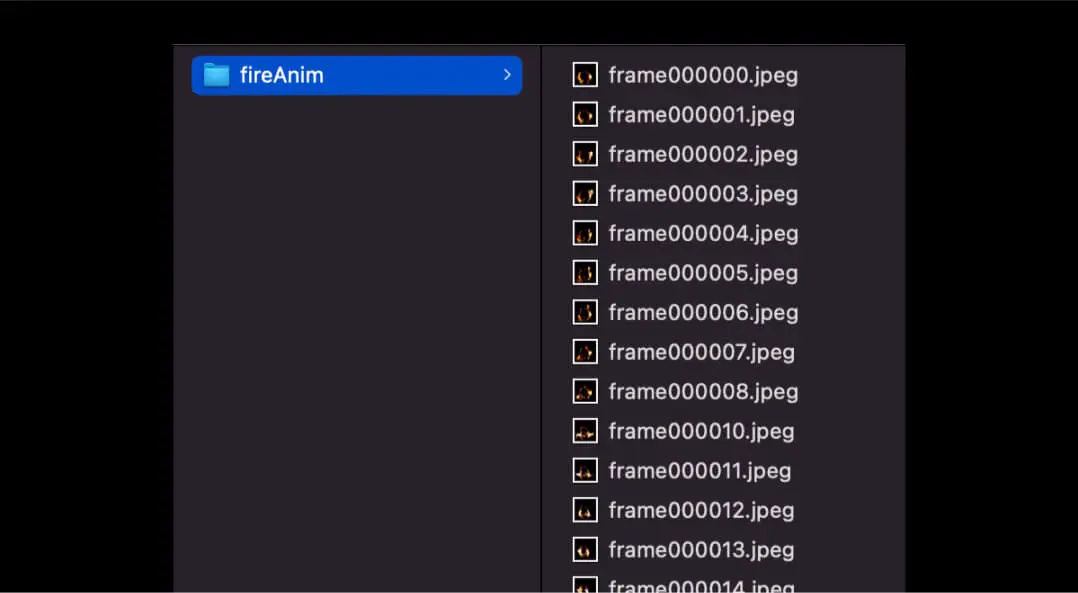
Animated textures
Image sequences used for animated textures should follow the guidelines for regular textures regarding their sizing, alpha channels etc., but they must also be:
- The same size
- Contained in the same directory
- Named in alphanumerical order they need to be displayed in. Eg frame000000.jpeg, frame000001.jpeg, frame000002.jpg, etc.
Shaders
It’s recommended to use the version of the shader with the least options. Eg. if you're not using the Texture slot of Unlit Texture Color, use “Unlit Color” instead.
Less efficient:

More efficient:

Testing and final touches
We don't enforce a hard limit on effect size, but for the best results, aim to keep the size as small as possible. 5 MB is a great benchmark for mobile web effects, although it might not always be realistic to achieve if you’re making effects for larger screens like Smart TVs.
If your project effect will be bigger than 10 MB, Studio will display a warning. You will still be able to export the effect, although it might be worth double-checking if there are any optimization steps you can still achieve before exporting your effect.
Less efficient:

More efficient:

🔥🔥🔥

Project File Formats
.deepar
This file is created when you export your effect from the DeepAR Studio. It can be used directly in the DeepAR SDK to display your effect.
.deeparproj
This file is created when you create a new project. It will contain all of the source files used to create your effect.