Textures
DeepAR Studio allows you to import and manipulate textures to enhance the visual quality of your augmented reality projects.
Supported texture formats
DeepAR Studio supports the following texture formats for importing and using in your AR projects:
PNG: A widely used image format known for its lossless compression and support for transparency (alpha channel).
JPG (JPEG): A common image format known for its efficient compression, primarily for photographs, but it does not support transparency.
Texture settings
Once you have imported a texture into DeepAR Studio, you have the flexibility to manually adjust various settings to fine-tune its appearance and performance.
You can change the texture settings by clicking on the Change settings button inside the Properties window, or by modifying them directly from the Properties window.

Change texture settings
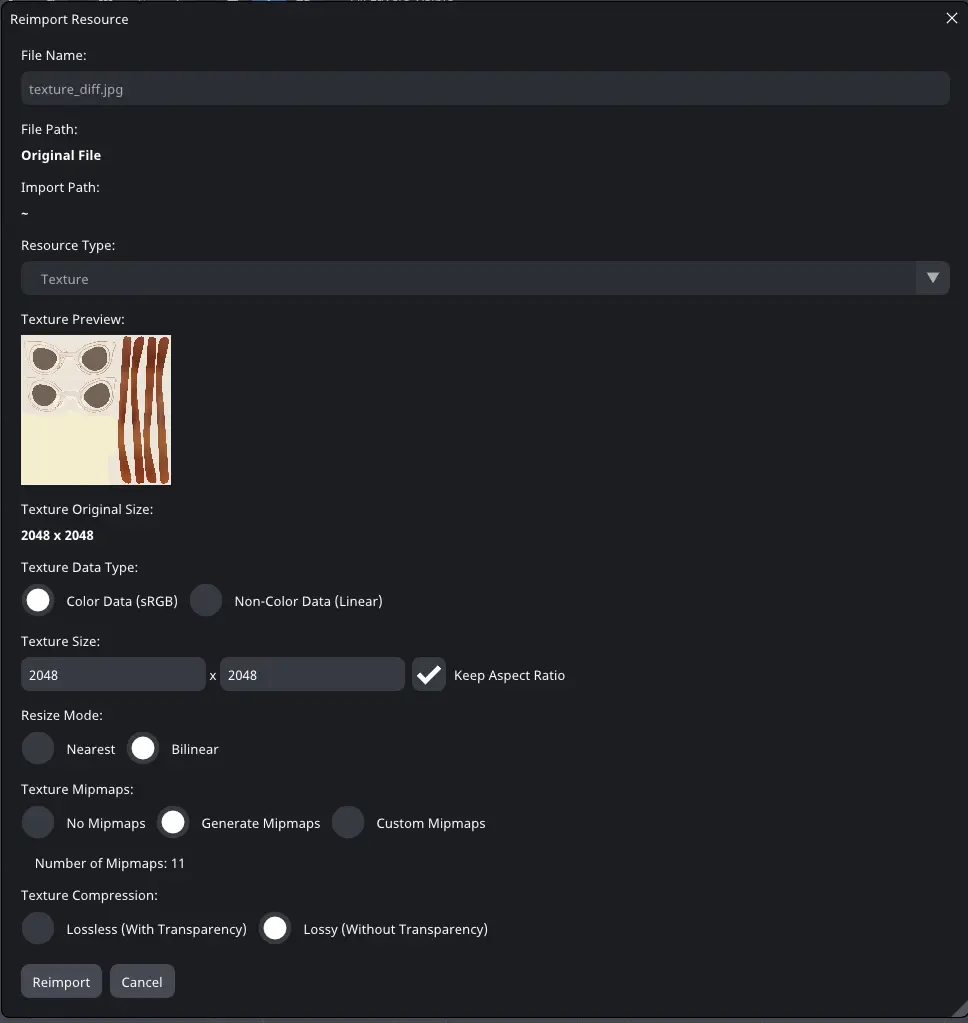
- Texture Data Type: Choose between “Color Data (sRGB)“ and “Non-Color Data (Linear)” to define how the texture’s colors are interpreted. sRGB is typically used for color texture, while Linear is suitable for non-color data, like normal maps or data not in gamma space.
- Texture Size: Adjust the dimensions (width and height) of the texture to fit your project’s requirements. Resizing textures can impact performance and quality.
for the best performance, resize the texture to a power of two (e.g., 2x2, 4x4, 8x8, 16x16, 32x32, etc.). Power of two textures have many benefits as they provide better texture compression, faster mipmap generation, GPU hardware optimizations, and many more.
- Resize Mode: Select between “Nearest Neighbor” and “Bilinear Interpolation” to determine how the texture is interpolated when resized. Nearest neighbor _provides a pixelated, blocky look, while _Bilinear interpolation offers smoother scaling.
- Texture Mipmaps: Decide whether to generate mipmaps for the texture. Mipmaps are smaller versions of the texture used to improve rendering performance and quality when the texture appears at varying distances.
- Texture Compression: Choose between “Lossless (With Transparency)” and “Lossy (Without Transparency)” compression. Lossless compression retains the highest image quality, while lossy compression may reduce quality but results in smaller file sizes.
- Wrap Mode: Choose between three modes: Clamp to Edge, Repeat, Mirror
- Clamp to Edge: Any texture coordinates that fall outside the texture’s boundaries are clamped or limited to the edge color of the texture. It is useful for keeping textures confined to their assigned areas, ensuring that they do not tile or repeat.
- Repeat: This is a default wrap mode. When the texture coordinates extend beyond the texture’s edges, they wrap around and continue from the opposite edge the texture. It is ideal for scenarios where seamless repetition of a texture is desired, such as creating backgrounds, floors, or walls with a continuous pattern.
- Mirror: This mode mirrors the texture when its coordinates go beyond the texture’s boundaries. It is often used to give objects a reflective or mirrored appearance.
Texture types
DeepAR Studio offers different types of textures, each serving a unique purpose in your AR projects. These texture types include:
- Regular texture: Regularly imported texture files like PNG or JPG.
- Camera texture: This texture renders the camera feed to the texture, allowing you to incorporate live camera input into your AR effects. It is especially useful for creating face filters and interactive camera effects.
- Render texture: You can select which layers will be rendered to this texture.
- Postprocessing texture: Postprocessing textures are used to apply post-processing effects.
- Hair mask texture: Hair mask textures are designed to segment and highlight hair in AR effects. They are particularly useful for hair color effects.
- Foreground texture: Foreground mask textures are used to segment and separate the foreground elements from the background in your AR scene.
- Animated texture - an image sequence or a video
Animated textures
DeepAR Studio supports animated textures, allowing you to create captivating and dynamic visual effects in your augmented reality projects.
To import animated textures click on the + button inside the Assets window.

Navigate to the folder on your computer that contains the texture frames for your animated texture. Ensure that the frames are sorted by name, from the first to the last frame, to maintain the correct order of animation.
All the texture frames must be of the same size and use the same compression type. Consistency in size and compression ensures that the animation functions smoothly and looks cohesive.
You can change the animation speed by modifying the FPS property inside the Properties window.

For a video texture, you can simply drag and drop to import it, as you would a PNG or JPG texture
Animated textures offer the opportunity to create a wide range of dynamic visual effects, including animated backgrounds, effects on 3D objects, and interactive AR experiences.
For more information on how to use animated textures check out the Animated Textures article