Physics and Scripting for Ping Pong Minigame
This tutorial explains the Physics and Scripting setup required to make a minigame
Watch the video tutorials or follow our step-by-step written tutorial with examples.
Download files before you begin the tutorial
For simplicity, we will start with the static objects already prepared in a project.
Download filesPhysics and Scripting Part 1
Physics and Scripting Part 2
Physics and Scripting Part 3
Open the DeepAR Studio Project
To follow along with the video tutorial, find the paddle_basic.deeparproj project in the downloads and open it. Start the live preview to see the effect applied to your head.
Set up Physics
We will make the Ball fall, and collide with the Paddle. If you want more information on what specific components are, do check out the Physics Mechanics docs.
Add Physics World
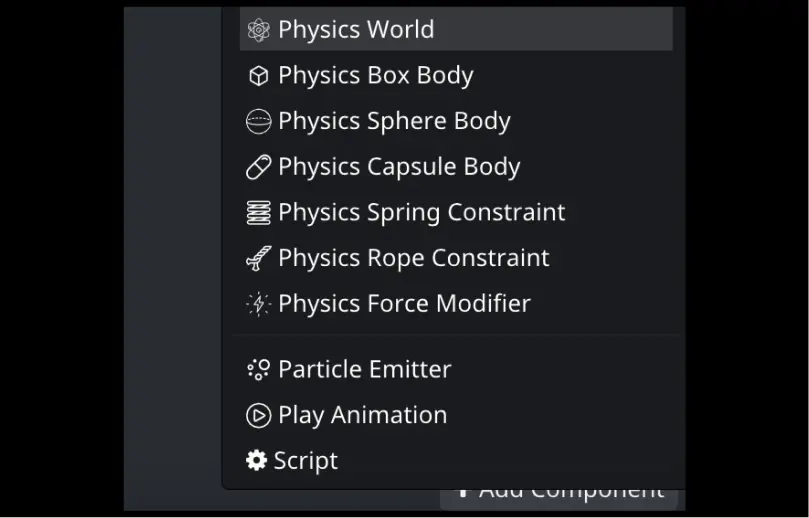
The first step of setting up Physics is to add a Physics World component to your effect. This component needs to be on a parent node to all Physic Body components. Select the Root Node and add a Physics World component.
Enable the Physics collider in the Preview
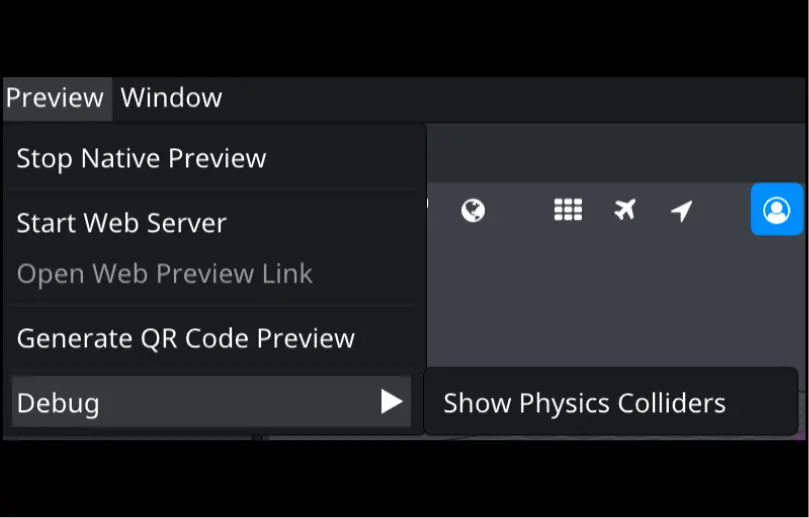
Now it would be a good time to enable colliders in the preview so you can better understand how the rest of the components will behave.
Set up Physics Bodies and Colliders
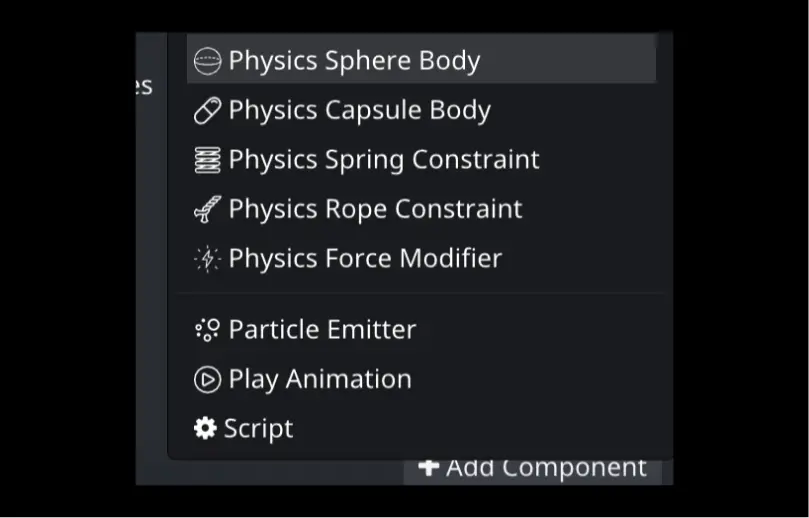
Select the Ball Node in the hierarchy and add the Physics Sphere Body component.
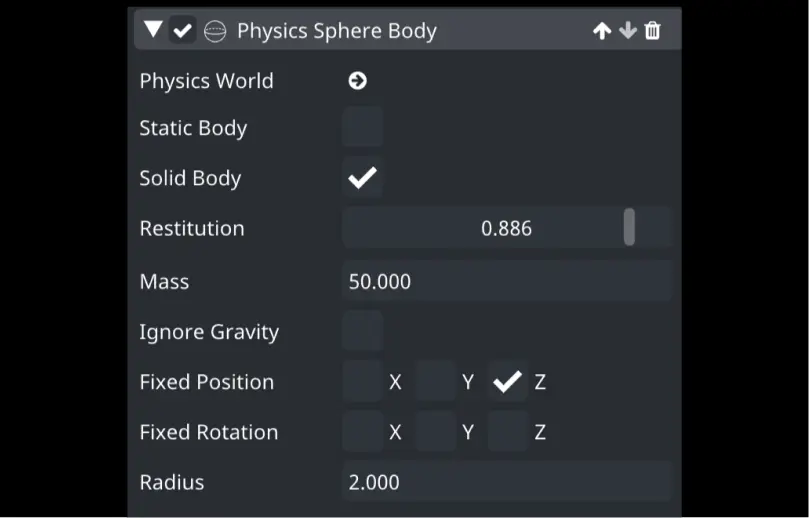
You will see that the ball now falls but this collider won't be visible in the Preview yet because it's smaller than the ball. To fix this you will need to increase the Radius to at least 2 so it matches the size of the ball.
The collider will now be visible.
You will also want to make the ball faster and bouncier. To achieve this, increase the Restitution and Mass parameters as shown below.
Finally, to avoid the ball moving forward and back we can fix it's Z position. This will be useful when we bounce the ball.
Next, we will want to add a collider to the paddle as well. To do this, we recommend you create a new Node, named PaddleCollider.
Let's position this node so it's aligned with the paddle.
We can approximate the shape of the paddle with a box, so let's add a Physics Box body to the PaddleCollider Node.
Check the Static Body box to fix it in place and prevent it from falling as the ball does. It will still move relative to the face.
Next increase the Restitution and the Extent so that it covers the entire paddle.
Adjust the Physics World
The ball will likely still be a bit slow and not bouncy enough, but we can adjust this by changing the Physics world properties. Select the Root Node again to edit them.
We want to increase the Kinematic knockback factor as well as the gravity.
Reset Colliders after a face is lost
Due to your static object (paddle) being tied to the face position, it might behave incorrectly after a face is lost.
To avoid this, select a parent object of the Paddle Collider and add a Disable Child Nodes component. Set the Disable Condition to Face invisible.
You have successfully finished the basic Physics set up! 🎉
The next thing we need to do is create a script to control the game behavior.
Script
We will make a script that reset the ball when it's lost and reacts to successful bounces.
For more info about scripting, check out the Scripting Documentation.
Add the Script
First, we need to create the script. To do this click the + button int the Assets panel and select the Script File.
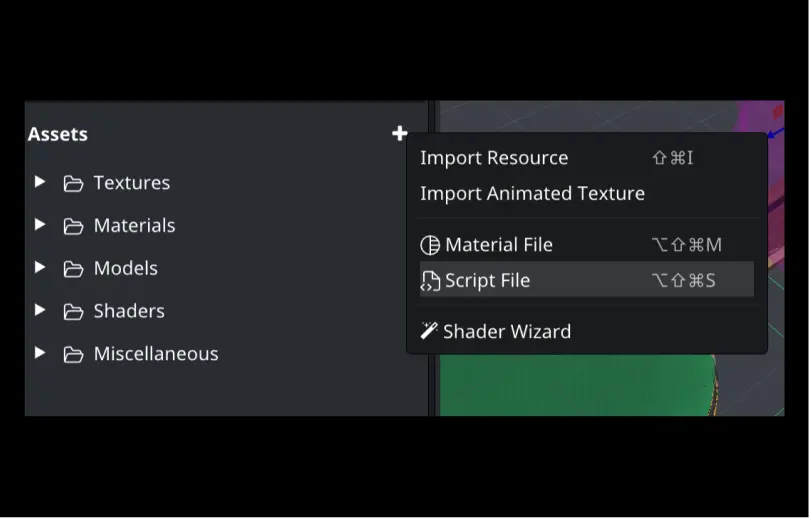
Rename the script so that it has a meaningful name, such as PingPong.js and save your project. You can now open the script in a text editor of your choice.
The generated script file will look like this:
// Use this for initialization
function onStart() {


}


// Update is called once per frame
function onUpdate() {


}
OnStart will be called as soon as the script initializes, and onUpdate will be called for every frame.
Whenever you are ready to apply your script, you should add it to a Node. Add the created Script to the Root Node.
Find the Ball
We will need to let our script know where to find the ball so we will create a variable for the ball and assign its value in the onStart() function. We have also added a 'start' log to verify that the script loaded correctly.
var ball;


// Use this for initialization
function onStart() {
   Debug.log('start');
   ball = Node.root.getChild('Ball');
}
If you save and reload, you should see a Scripting console pop up with the log:
Face Visibility
As mentioned in Reset colliders after a face is lost, there is a component that will enable and disable nodes depending on the visibility of the face. Previously you were instructed to place it on a parent of the Paddle Collider, for this part of the tutorial you will want to place it on a parent of both the Ball and the paddle, so if it wasn't already on the root node, place it there.
We still need to reset the ball position when the face reappears. That is if the face is visible in this frame but it was not visible in the previous frame. For that, we will need to remember if the face was visible in the last frame and add a resetBall() function.
...
var prevFaceVisible;


function resetBall(){
   ball.localPosition = new Vec3(0, 8, 15);
}


// Use this for initialization
function onStart() {
   ...
   prevFaceVisible = Context.isFaceVisible();
   if (prevFaceVisible){
       resetBall();
   }
}


// Update is called once per frame
function onUpdate() {
   var faceVisible = Context.isFaceVisible();
   if (faceVisible){
       if (!prevFaceVisible){
           resetBall();
       }
   }
   prevFaceVisible = faceVisible;
}
The position used in the resetBall() function was found by reading the start position of the ball in the Studio and adjusting it to be centered above the paddle.
Dropped the Ball?
Similarly, there are many ways to check if the ball has fallen out of the playable area. The easiest is to temporarily disable physics and simply drag the ball object down until it becomes invisible in the Preview. Then use that local position as a condition to reset the ball position.
// Update is called once per frame
function onUpdate() {
   ...
   if (ball.localPosition.y < -25){
       resetBall();
   }
   ...
}
When Nodes Collide
Now let's make the effect a bit more interactive.
We'd like to indicate when the ball bounces off the paddle successfully.
If you look at the white_rubber_mat material, you will see that the Color of the paddle rubber can be easily changed. Let's first change this color when the ball bounces.
Let's go back to the script, there's still some work to do.
First, we need two new variables. One for the paddleCollider and one to remember the color state. We will initialize them OnStart, similar to the Ball and prevFaceVisible.
Now we can use the onCollisionEnter callback function to check if the objects collided are the ball and the paddle (technically, those are the only two objects that could collide in this effect, but let's do it anyway for good practice).
For this, we have the checkIfCollidedWithPaddle function.
If our collision is between the Ball and the Paddle we can use Utility.changeParameter to change the paddle color, and toggle the value of our colorToggle variable.
// Use this for initialization
function onStart() {
   ...
   paddleCollider = Node.root.getChild('paddle_v4.fbx').getChild('paddle').getChild('PaddleCollider');
   colorToggle = true;
   ...
}


function onCollisionEnter(firstNode, secondNode){
   if (!checkIfCollidedWithPaddle(firstNode, secondNode)) return;
   changePaddleColor();
}


function checkIfCollidedWithPaddle(firstNode, secondNode) {
   var collides = false;
   if (firstNode.equals(ball))
       collides = secondNode.equals(paddleCollider);
   else if (firstNode.equals(paddleCollider))
       collides = secondNode.equals(ball);
   return collides;
}


function changePaddleColor() {
   if (colorToggle)
       Utility.changeParameter('white_rubber', 'MeshRenderer',
                              'u_color', 0.6, 0.1, 0.00, 1.0)
   else
       Utility.changeParameter('white_rubber', 'MeshRenderer',
                               'u_color', 0.1, 0.6, 0.0, 1.0);

   colorToggle = colorToggle ? false : true;
}
Sound
Let's add a sound effect for when the ping-pong ball hits the paddle, as is often heard in real-life games. We can leave the script alone for a moment and visit the Assets panel and the Animation Controller.
Import the hit.mp3 sound from the Assets panel.
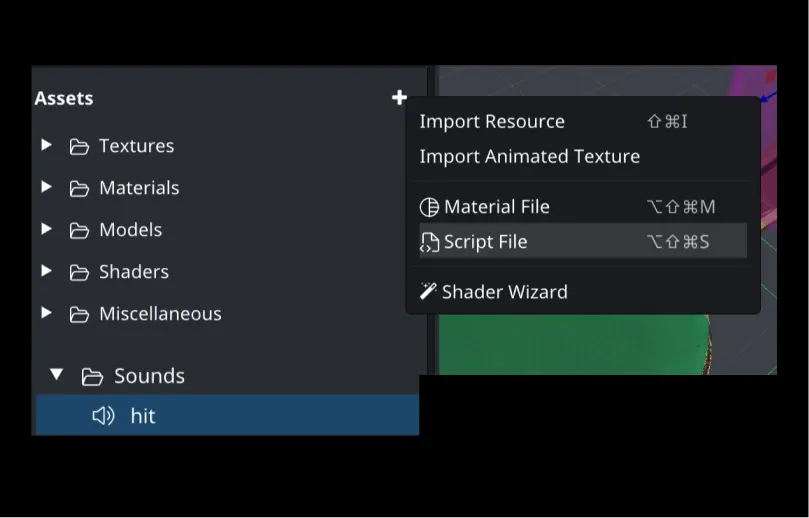
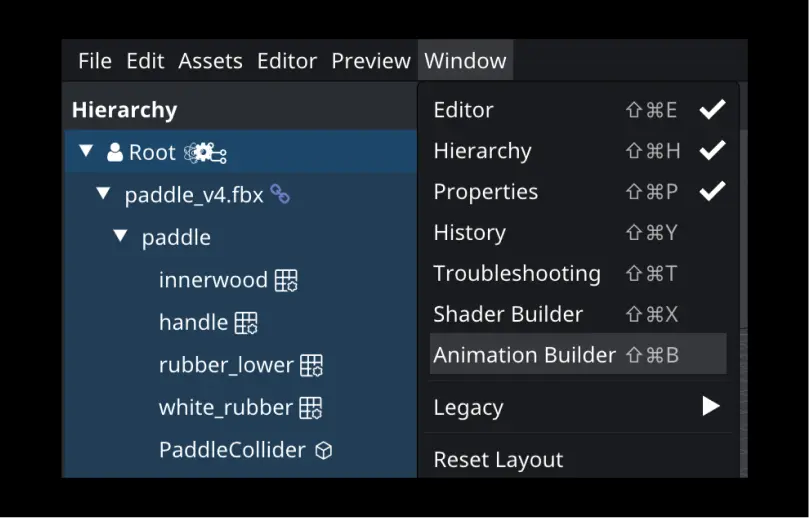
Select the Root node, and open the Animation Builder. Window → Animation Builder
Create an empty animation and add a new State. This new state will play the hit sound. The triggers are shown below:
Initial → State [custom trigger 'hit'] State → Initial [OnEnd]
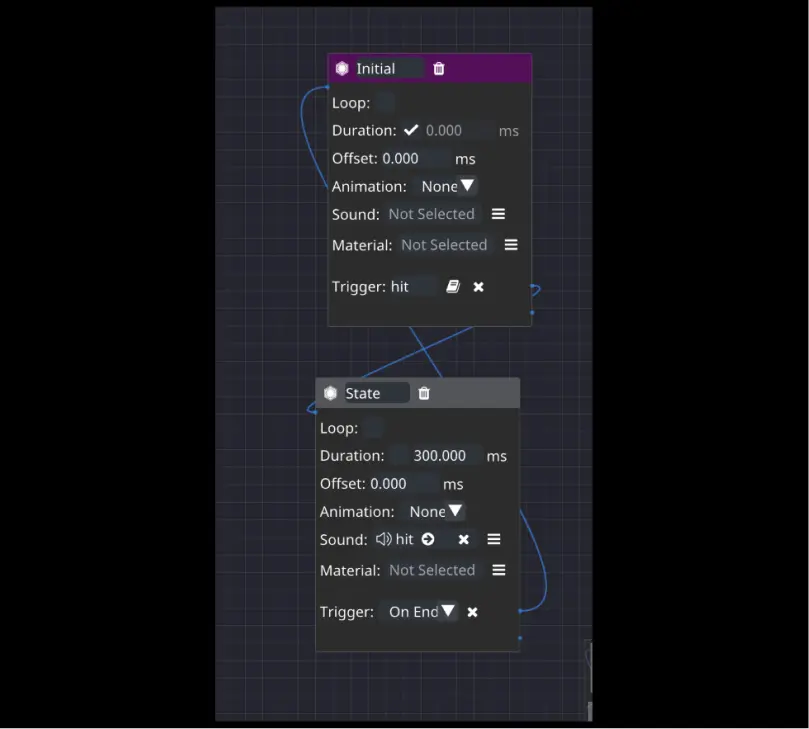
Now all we need to do is send the 'hit' trigger from our script.
function onCollisionEnter(firstNode, secondNode){
   if (!checkIfCollidedWithPaddle(firstNode, secondNode)) return;
   ...
   Utility.fireTrigger('hit');
}
The sound should now play.
Try it out
Test your effect in the preview and compare your script to ours.
var ball;
var prevFaceVisible;
var paddleCollider;
var colorToggle;


function resetBall(){
   ball.localPosition = new Vec3(0, 8, 15);
}


// Use this for initialization
function onStart() {
   Debug.log('start');
   ball = Node.root.getChild('Ball');
   paddleCollider = Node.root.getChild('paddle_v4.fbx').getChild('paddle').getChild('PaddleCollider');
   colorToggle = true;
   prevFaceVisible = Context.isFaceVisible();
   if (prevFaceVisible){
       resetBall();
   }
}


// Update is called once per frame
function onUpdate() {
   var faceVisible = Context.isFaceVisible();
   if (faceVisible){
       if (!prevFaceVisible){
           resetBall();
       }
   }
   if (ball.localPosition.y < -25){
       resetBall();
   }
   prevFaceVisible = faceVisible;
}


function onCollisionEnter(firstNode, secondNode){
   if (!checkIfCollidedWithPaddle(firstNode, secondNode)) return;
   changePaddleColor();
   Utility.fireTrigger('hit');
}


function checkIfCollidedWithPaddle(firstNode, secondNode) {
   var collides = false;
   if (firstNode.equals(ball))
       collides = secondNode.equals(paddleCollider);
   else if (firstNode.equals(paddleCollider))
       collides = secondNode.equals(ball);
   return collides;
}


function changePaddleColor() {
   if (colorToggle)
       Utility.changeParameter('white_rubber', 'MeshRenderer',
                              'u_color', 0.6, 0.1, 0.00, 1.0)
   else
       Utility.changeParameter('white_rubber', 'MeshRenderer',
                               'u_color', 0.1, 0.6, 0.0, 1.0);

   colorToggle = colorToggle ? false : true;
}